How to back up your server data and restoring from it in 7 Days to Die
Last Update 2025-01-28 13:25:18
Backing Up Your 7 Days to Die Server Data
Backing up your server data is an essential step to ensuring a smooth gaming experience in 7 Days to Die. This guide will walk you through the process of backing up your game server data, specifically focusing on how to connect through FTP, locate your important game files, and how to restore them if needed.
Step 1: Preparing Your Server
Before you start, it is crucial to shut down your server. Modifying server files while the server is running can corrupt your data and break the game, so make sure it's completely powered down.
Step 2: Connecting through FTP
To access your server files, you will need an FTP (File Transfer Protocol) client. If this is your first time using FTP, please refer to our detailed guide here.
Follow these steps to connect:
- Download and install an FTP client such as FileZilla or WinSCP.
- Launch your FTP client and enter your server credentials (Host, Username, Password, Port).
- Click 'Quickconnect' to establish a connection to your server.
- Once connected, you should see your server files displayed on the right, and your local files on the left.
Step 3: Locating the Save Data
Your save data is crucial for maintaining your progress. The primary save data location can be divided into a few key folder structures:
- World Save Data: Located in
Saves/. Here, GameWorld is the map name, and SaveName is the name you chose in the basic settings or config file./ / - Server Configuration: The configuration options are found in
Saves/serveradmin.xml. - Mods: If you're using mods, they can be backed up as they reside in the
Mods/folder.
Step 4: Downloading Folders and Files for Backup
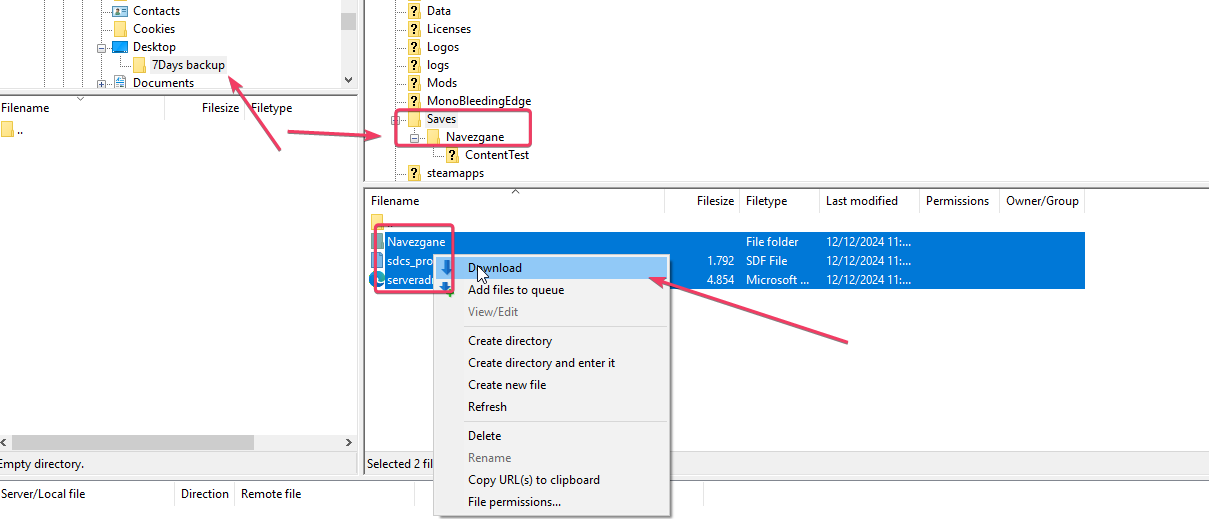
To back up your server data, you will need to download the necessary files and folders to your local PC:
- Navigate to the corresponding directory using your FTP client.
- Select the
GameWorld(in this example, the game world is "Navezgane") folder and theserveradmin.xmlfile. Right-click and select "Download" to save these files to a designated backup folder on your computer.

- Don’t forget to download the entire
Mods/folder if you have installed any mods.
Restoring Server Data from a Backup
If you ever need to restore your server to a previous state, you can easily do so by uploading the backed-up files:
- Ensure your server is completely shut down before making changes.
- Reconnect to your server using the FTP client.
- Drag and drop the backed-up folders and files into the relevant directories on your server:
- Upload your backed-up
GameWorldfolder back toSaves/. - Upload the
serveradmin.xmlfile back toSaves/. - Upload the
Mods/folder back to the server root if necessary.
- Upload your backed-up
Note: Single player save data may be incompatible with multiplayer version in the server, so it may not be possible to upload a specific game world to it.
Conclusion
Backing up your 7 Days to Die server data is a straightforward process that can save you from losing your hard-earned progress. By following this guide, you will be able to back up and restore your game server effortlessly. Happy zombie apocalypse!