Last Update 2025-09-03 16:36:09
How to become an Admin on your server
Taking on the admin role on your SCUM server elevates you from a mere survivor to the ultimate director of your island's fate. With admin privileges, you gain the power to moderate your community, troubleshoot in-game issues, spawn items for events, and customize the gameplay experience in real-time. It's the key to protecting your players and shaping the kind of fair, challenging, or chaotic environment you want to create.
Becoming an admin is a straightforward process that simply involves adding a player's SteamID to a specific configuration file. This guide will walk you through the exact steps to grant admin access, explain how to assign special permissions like God Mode, and provide a detailed reference list of the powerful commands you will unlock. With these tools, you'll be ready to manage your server effectively and build a thriving community.
Steps to Become an Admin on your SCUM Server
Part 1: Gaining Access to Chat Commands (# Commands)
This is the first level of admin access, allowing you or other players to use text commands in the in-game chat window.
- Open your server configuration, click on the Config Manager option on the left panel and create a template for
AdminUsers.ini.
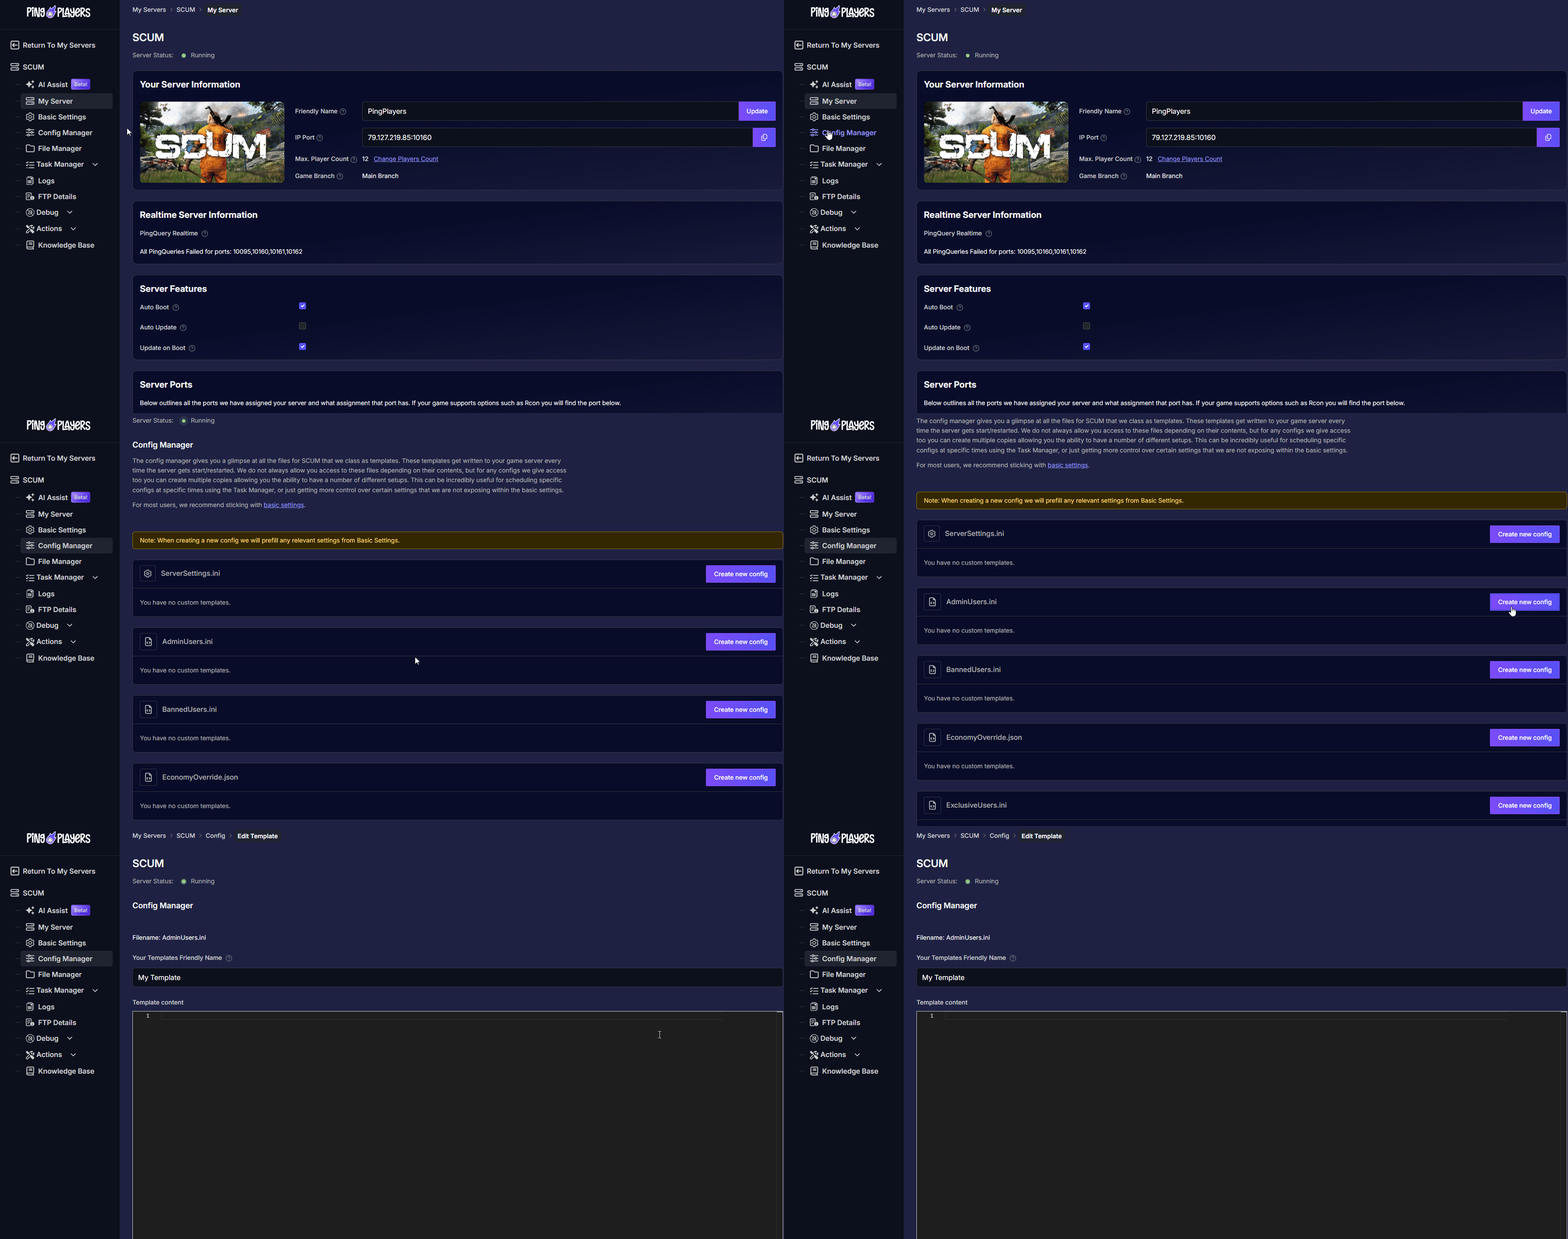
- Place the desired SteamIDs into this file (one per line) to give those players admin rights. Once granted the admin status, they will be able to execute basic commands.
(Find at the bottom of this guide lists of available commands)
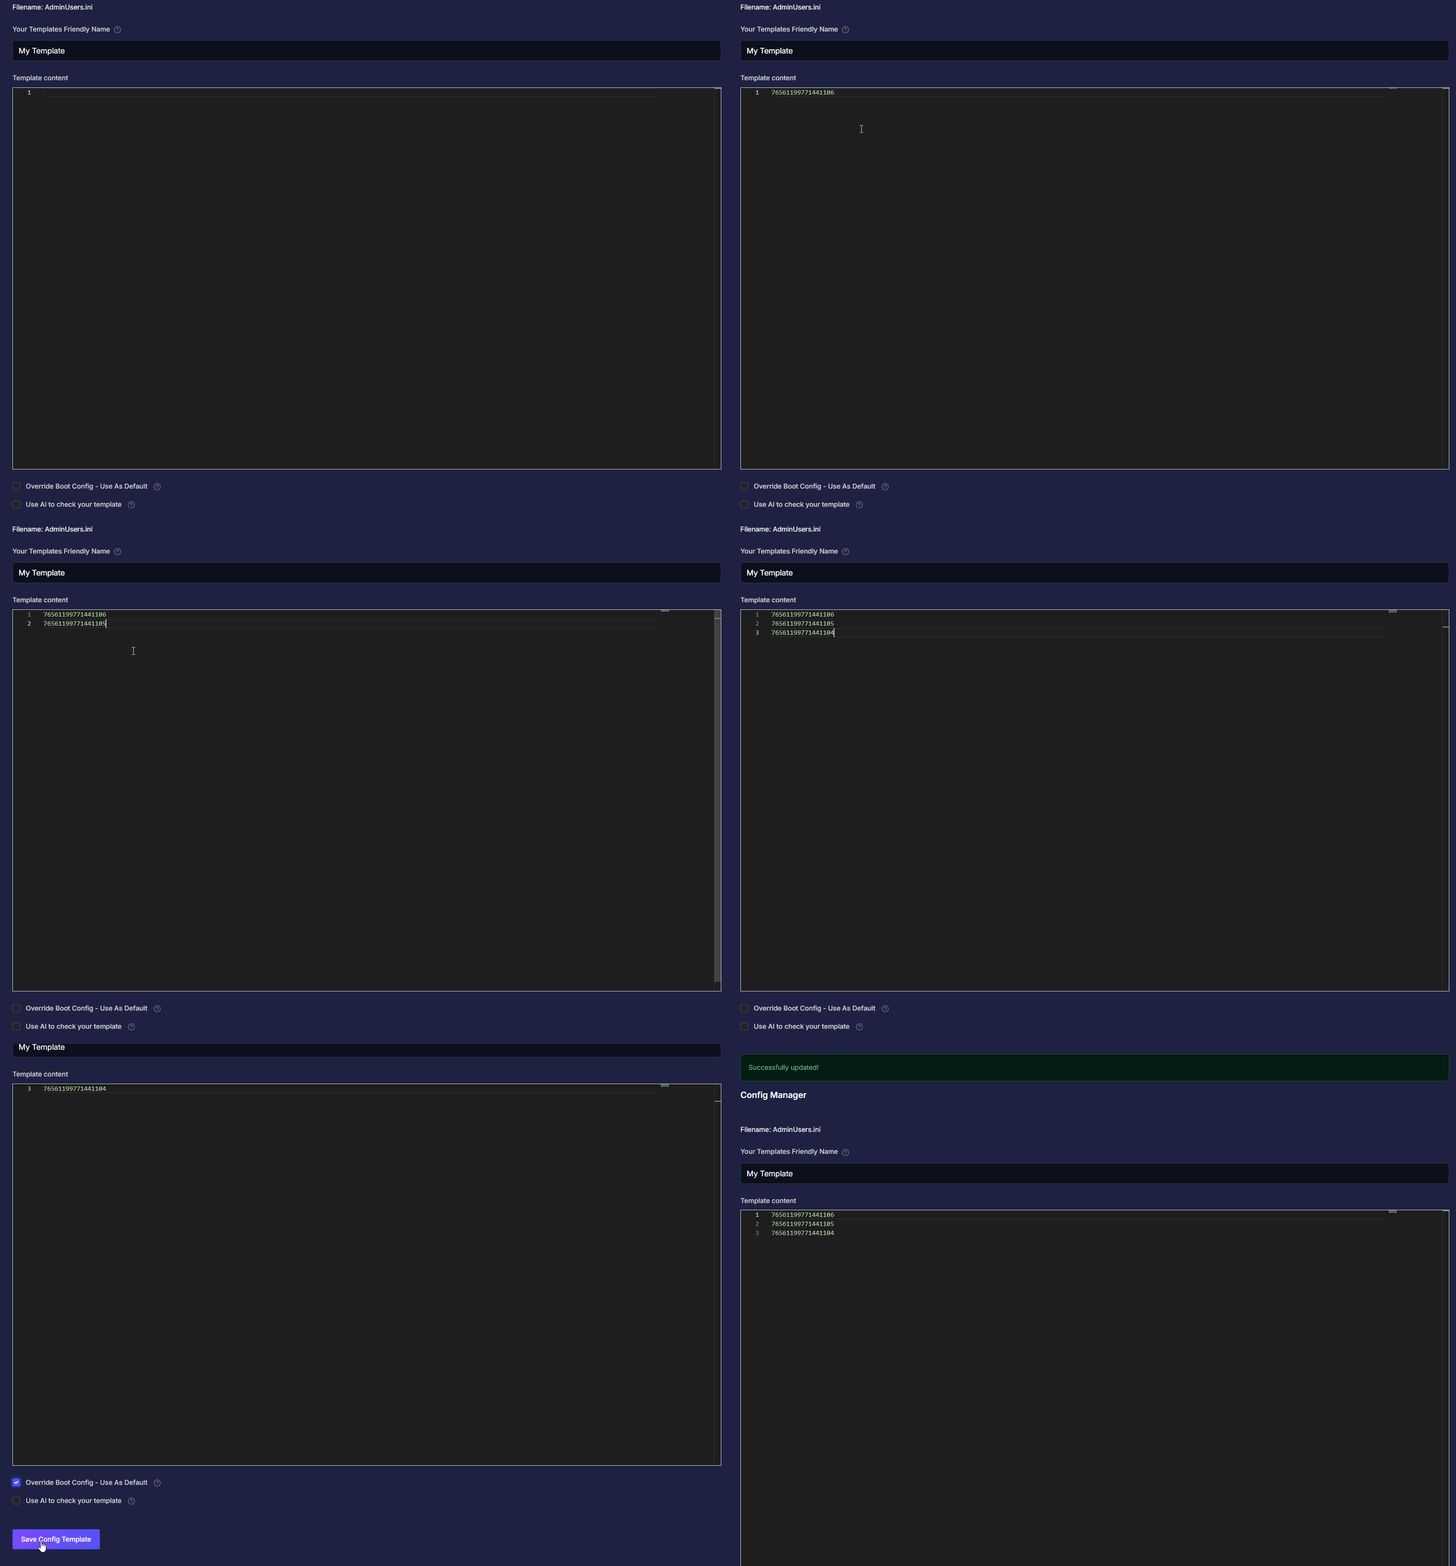
Save the template by clicking on Save Config Template and ensure it is your active config by putting a check on Override Boot Config - Use as Default.
- Restart the server by pressing
 > Restart, on the left panel in the server configuration.
Note: You can also grant players access to additional commands by adding specific arguments next to their SteamID. The accessible arguments are either [SetGodMode] or [RestartServer]. They give player access to the #SetGodMode True/False command, which enables or disables instant building and the #RestartServer pretty please command, which will initiate a shutdown sequence of the server.
Example of adding a user to AdminUsers.ini:
76561199637135087 <- enabling admin commands
76561199637135087[SetGodMode] <- enabling admin commands + setgodmode
76561199637135087[SetGodMode, RestartServer] admin commands + setgodmode + "restartserver pretty please"
Restart command doesn't really work with the server, it'll require a restart on the website as well to boot up again.
Once logged in as admin, you can use admin commands with the # prefix.
Part 2: Gaining Access to the Admin Settings Menu (ESC Menu)
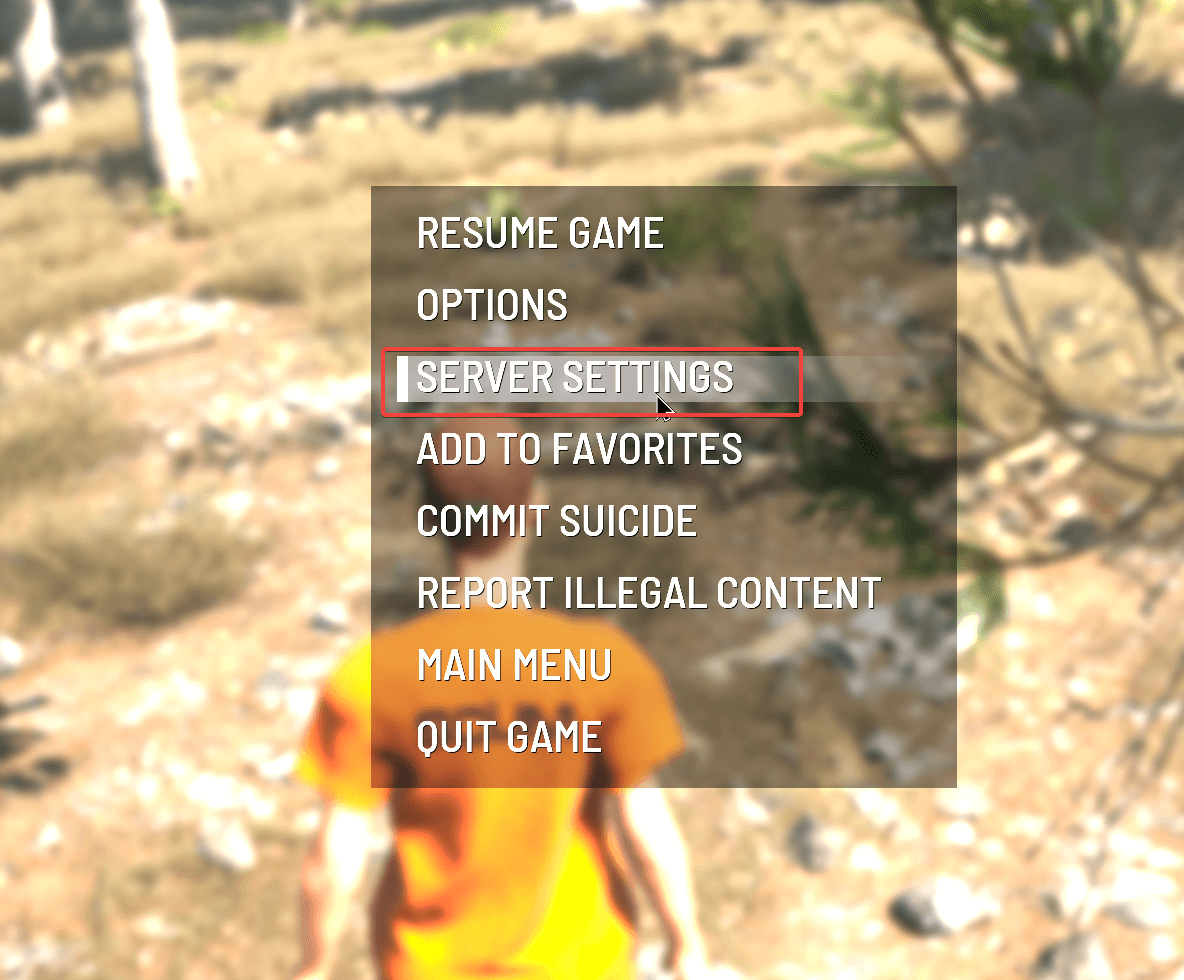
For more powerful visual control over your server, you can grant access to the in-game admin settings menu. This allows you to adjust server settings in real-time without using chat commands. This requires editing a different file.
- In your server's Config Manager, find or create a new template for the
ServerSettingsAdminUsers.inifile.
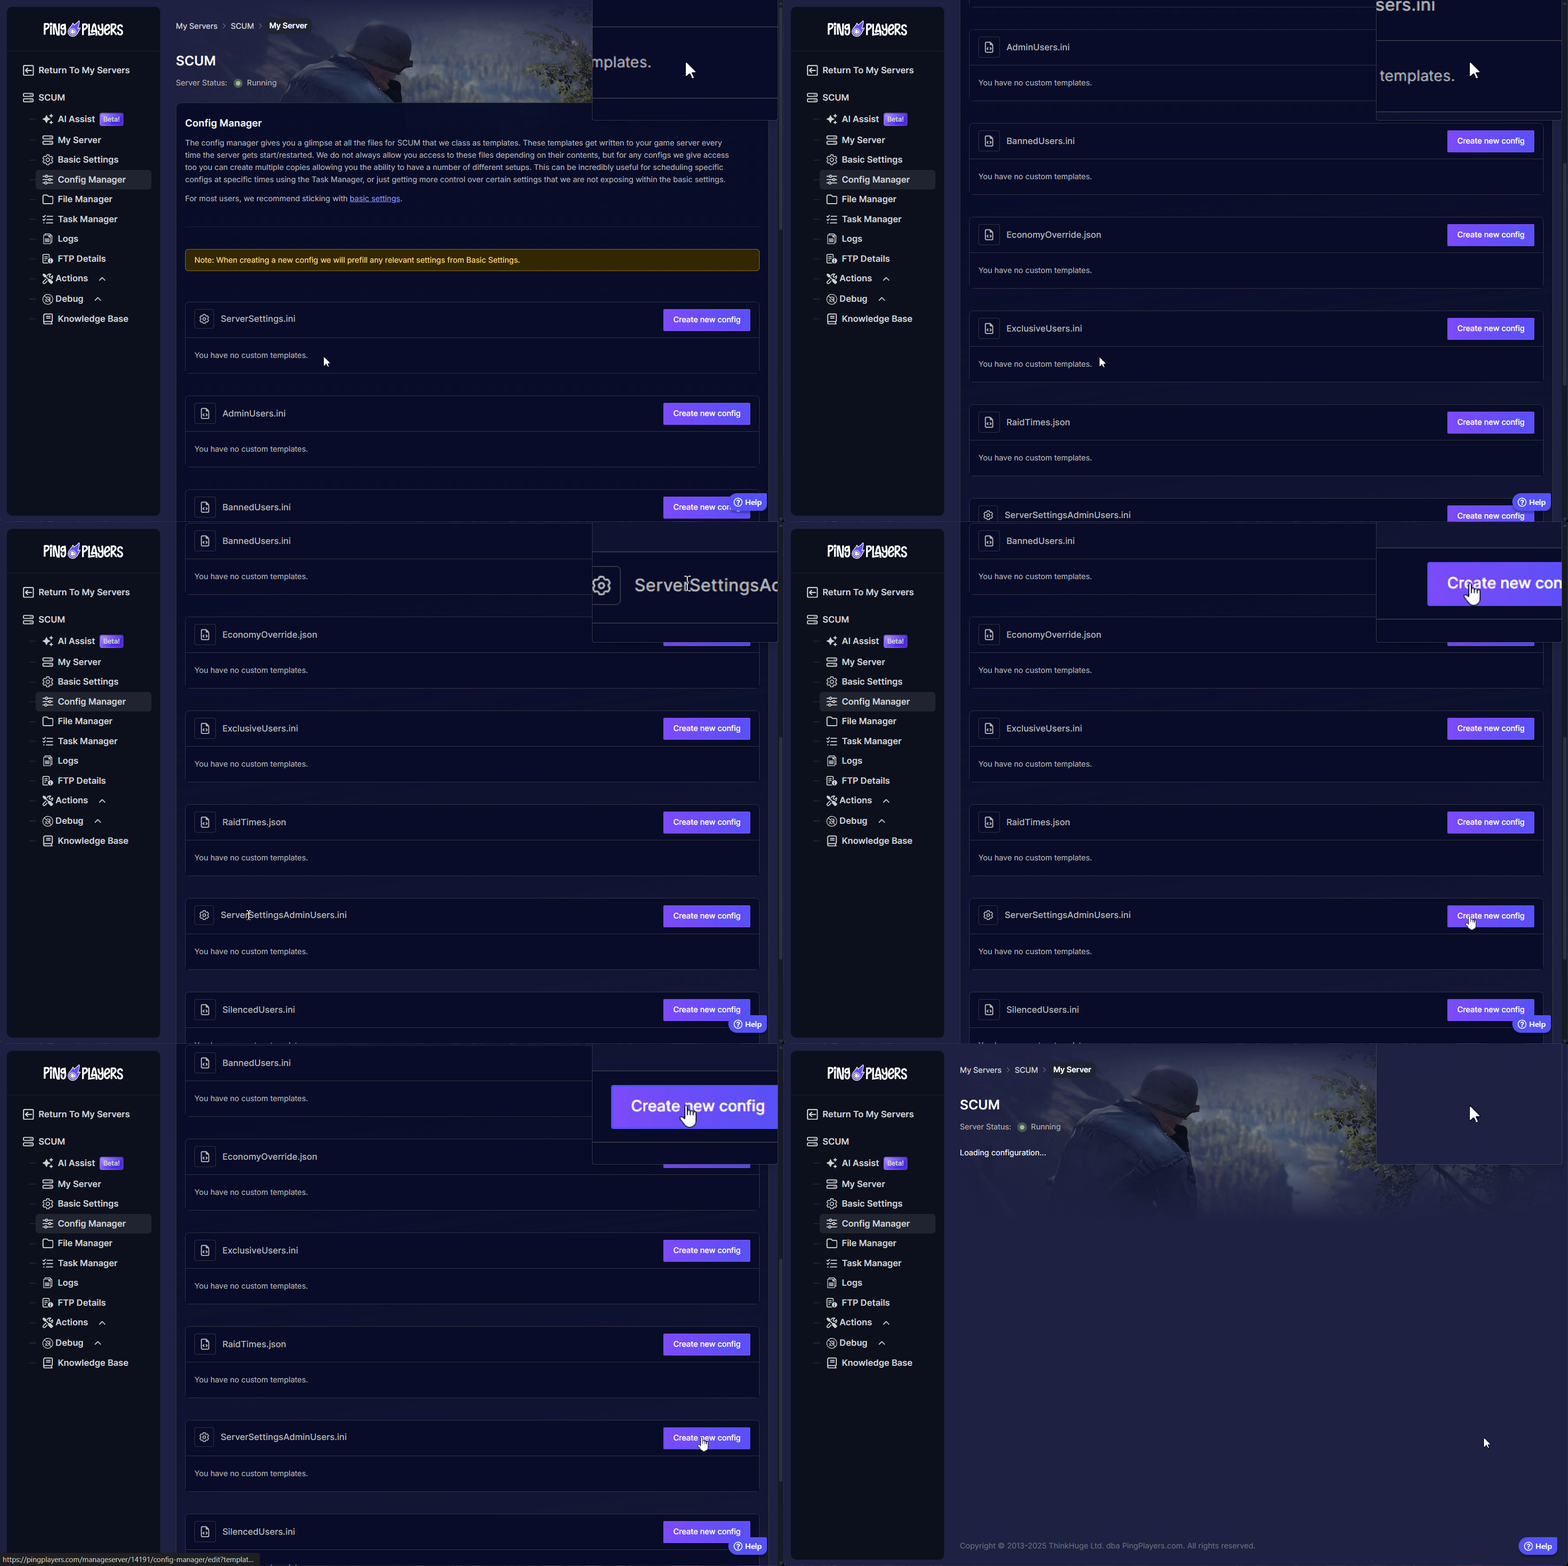
- Once the template is created, add the SteamID64 of the player you want to grant access to (one per line). If the heading doesn't exist, add it.
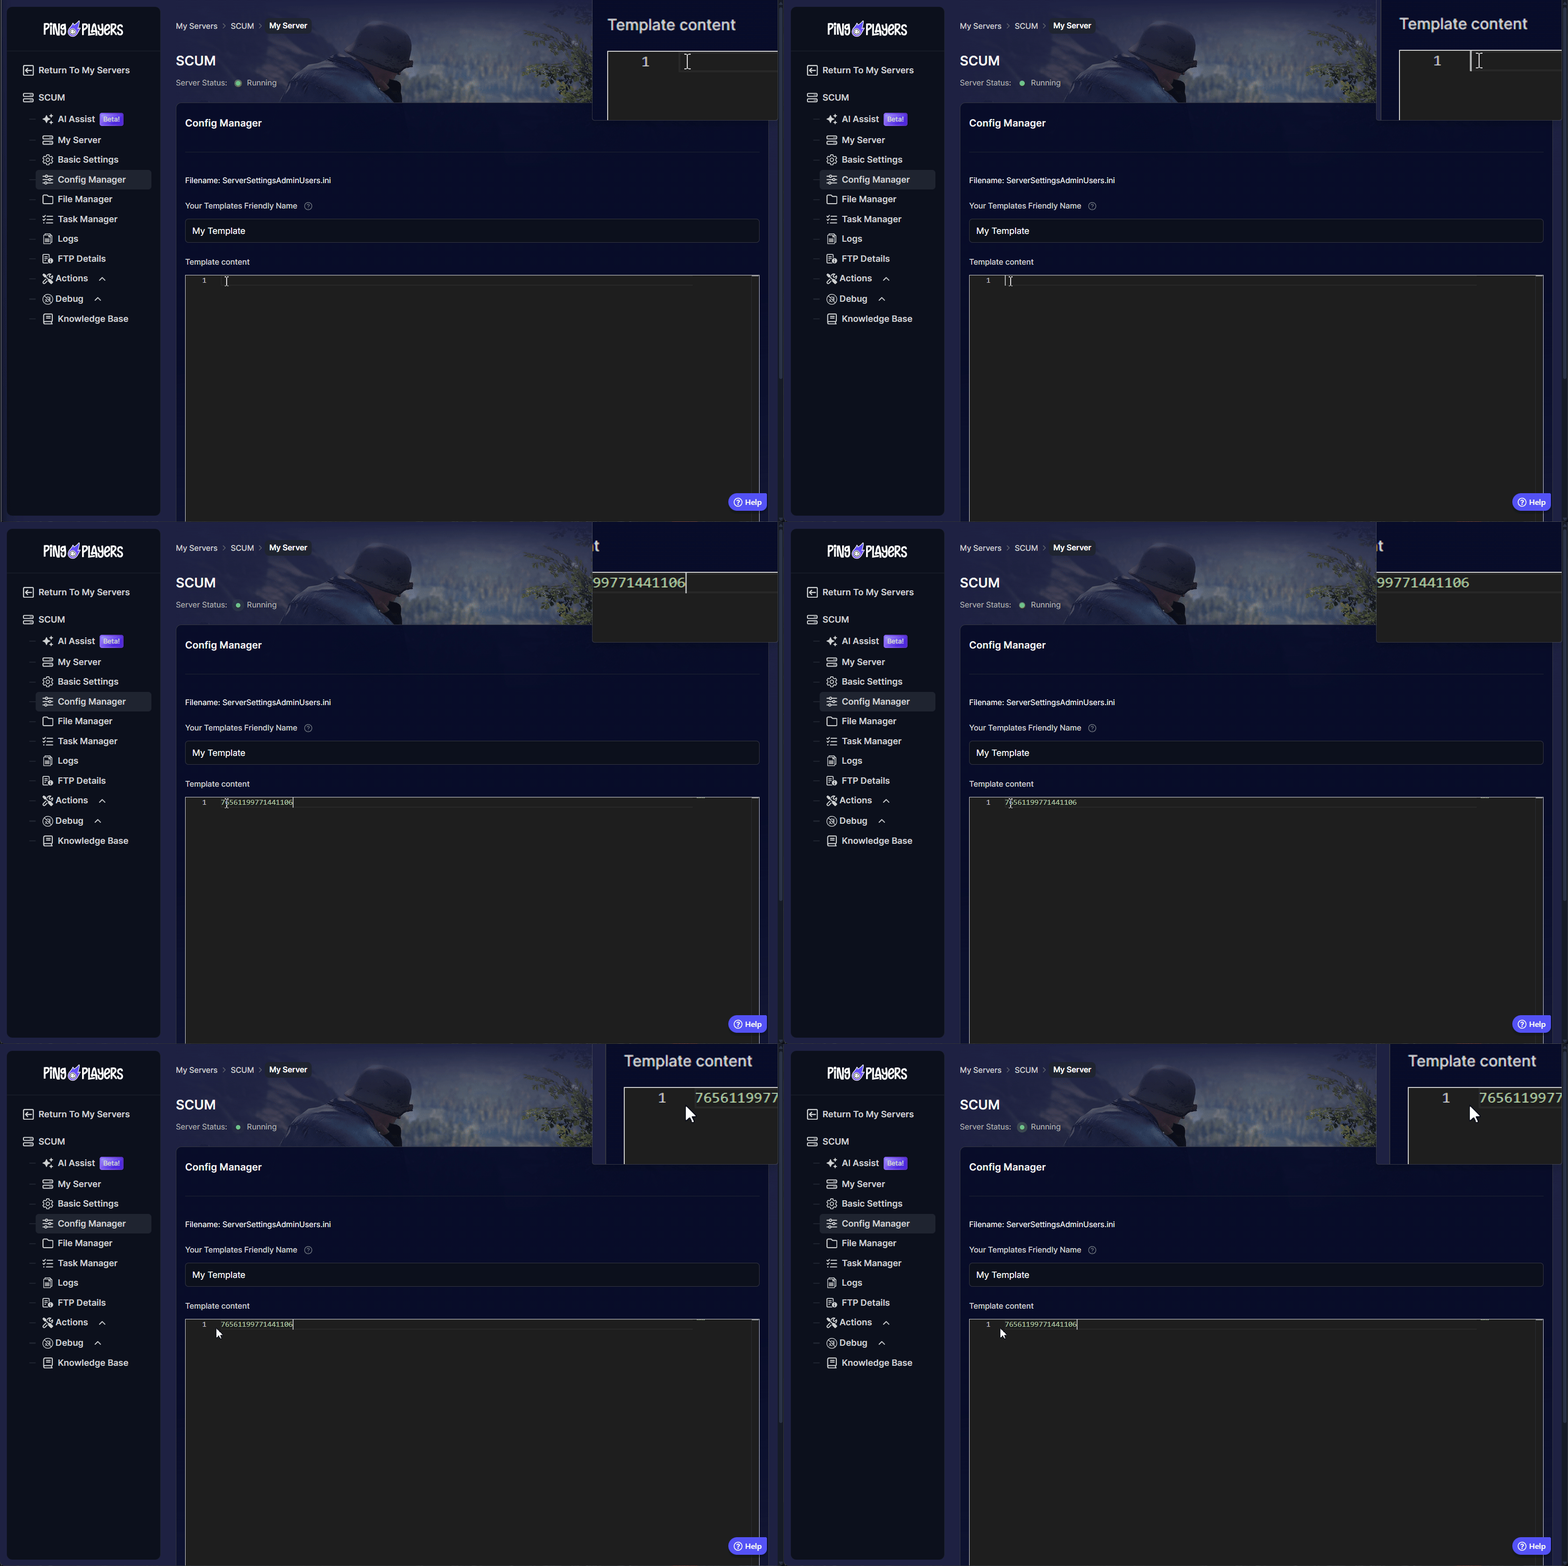
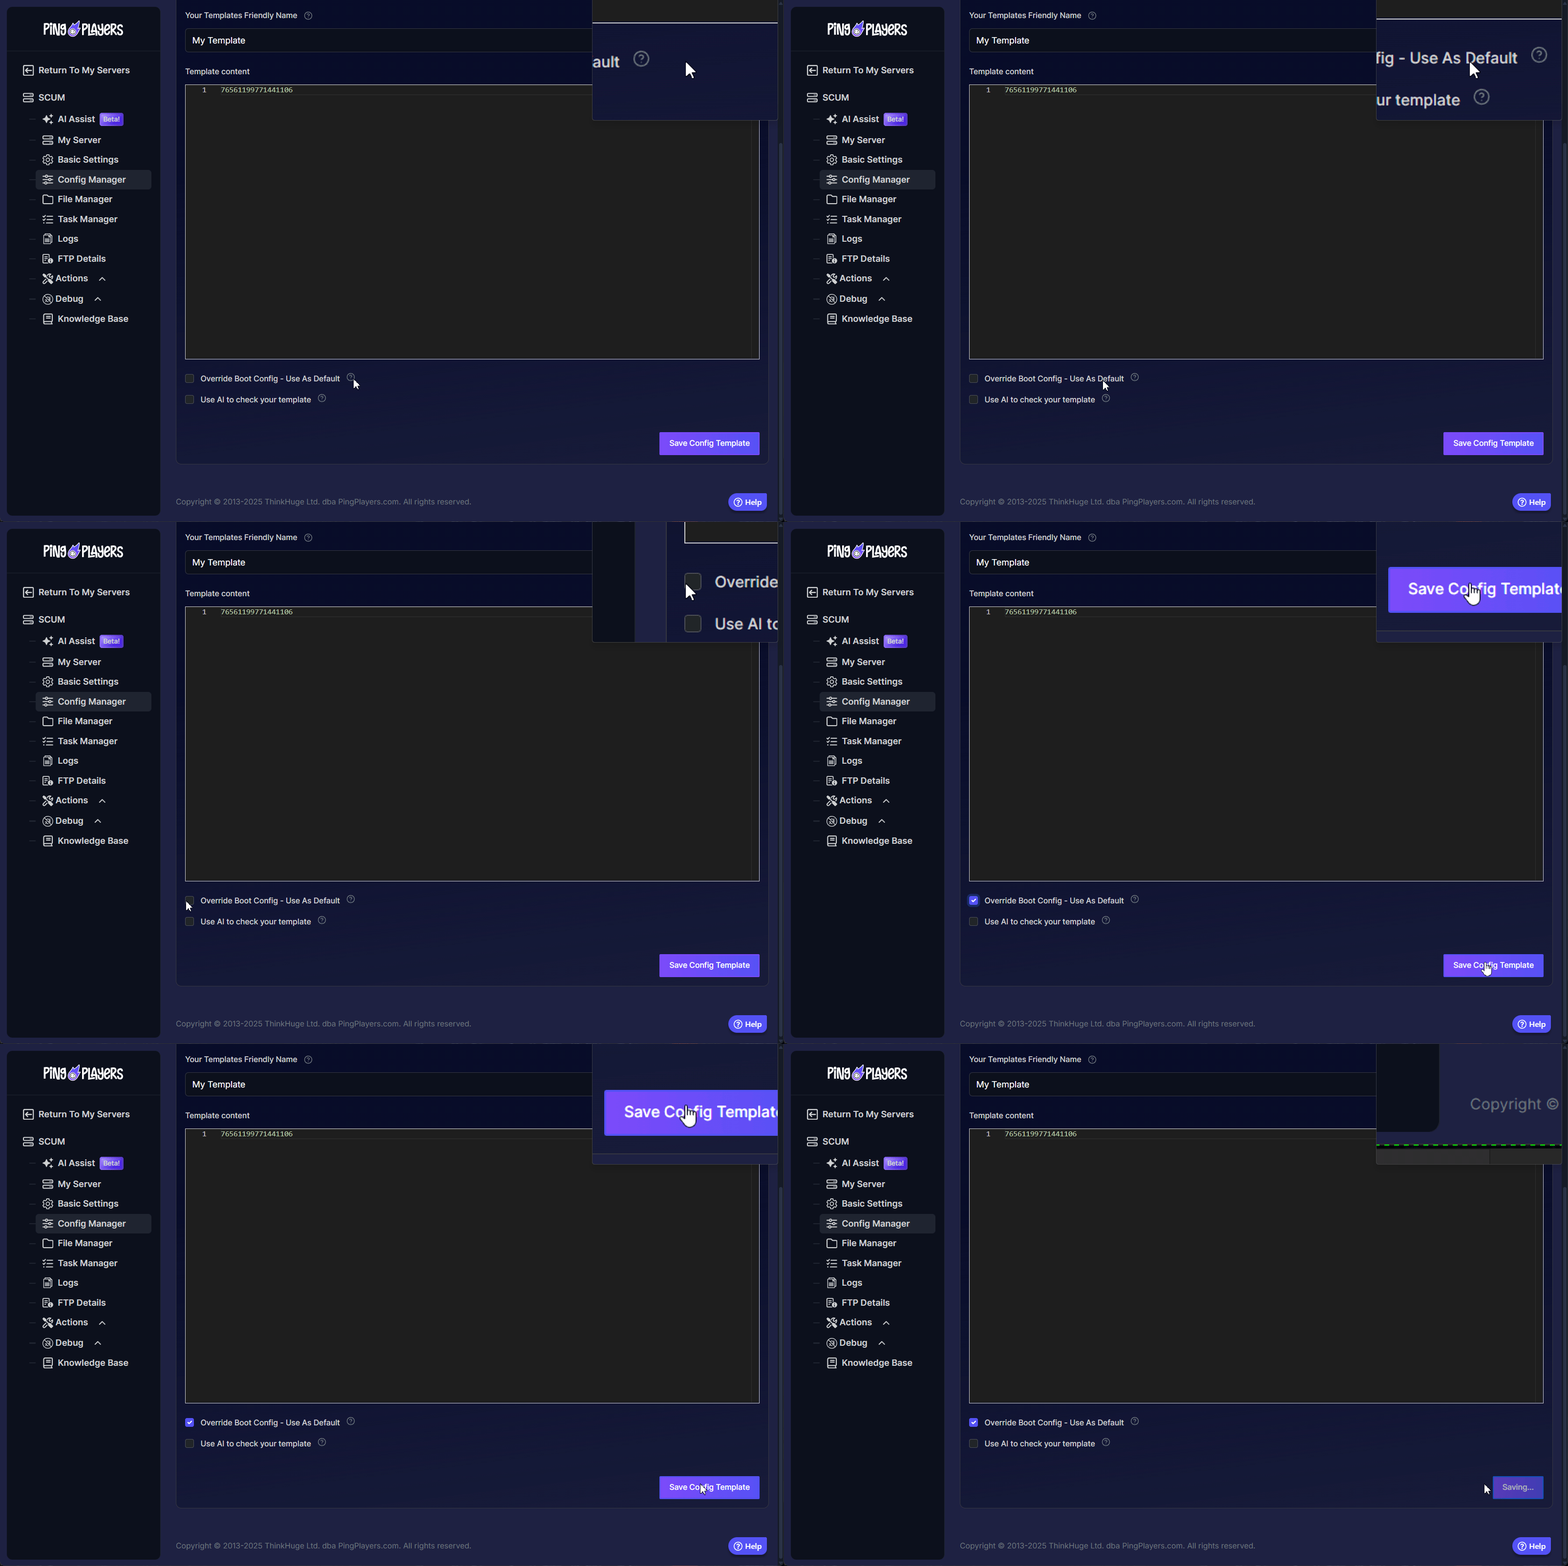
- Save the template by clicking on Save Config Template and ensure it is your active config by putting a check on Override Boot Config - Use as Default.
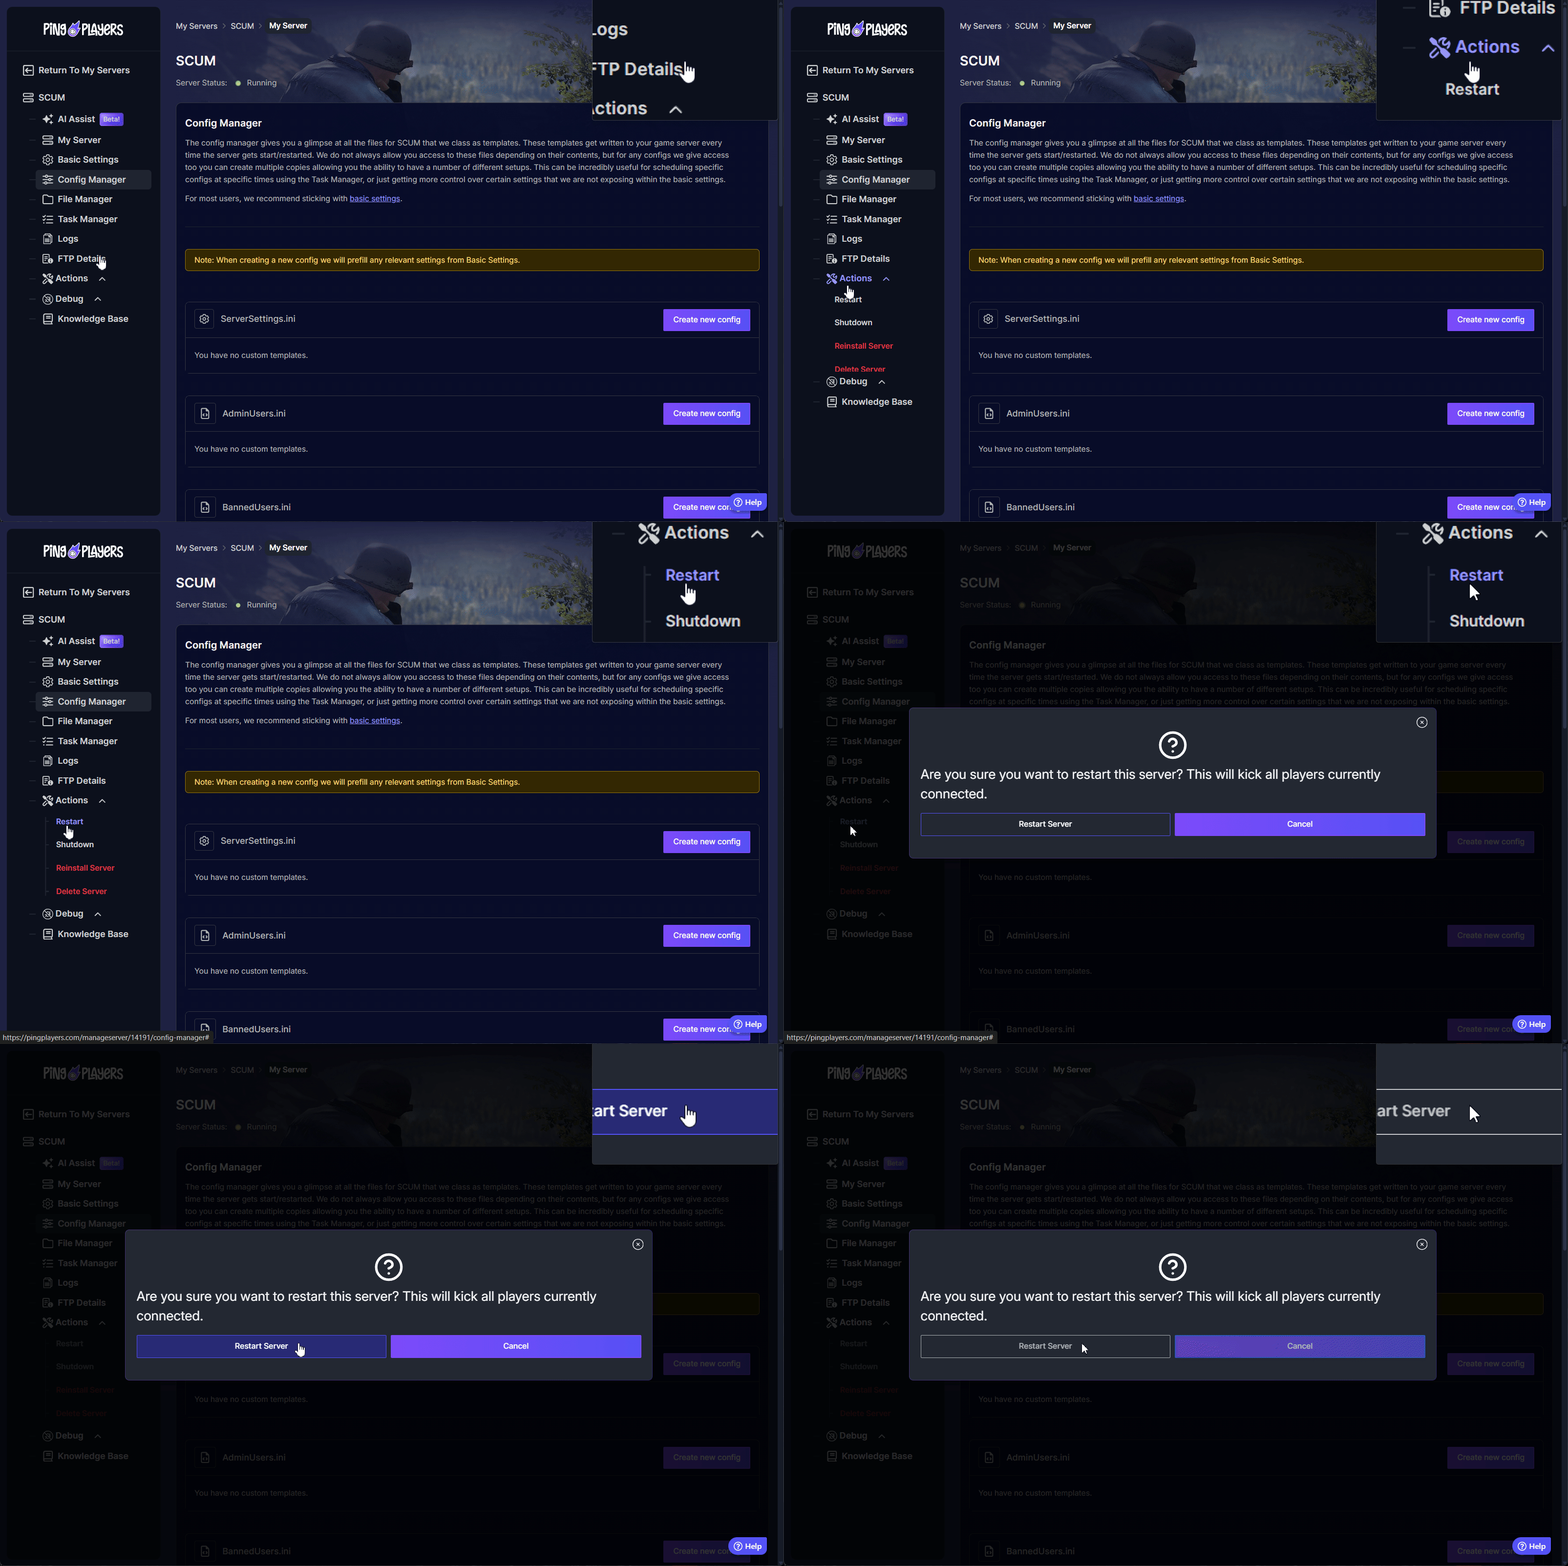
- Restart the server by pressing
 > Restart, on the left panel in the server configuration.
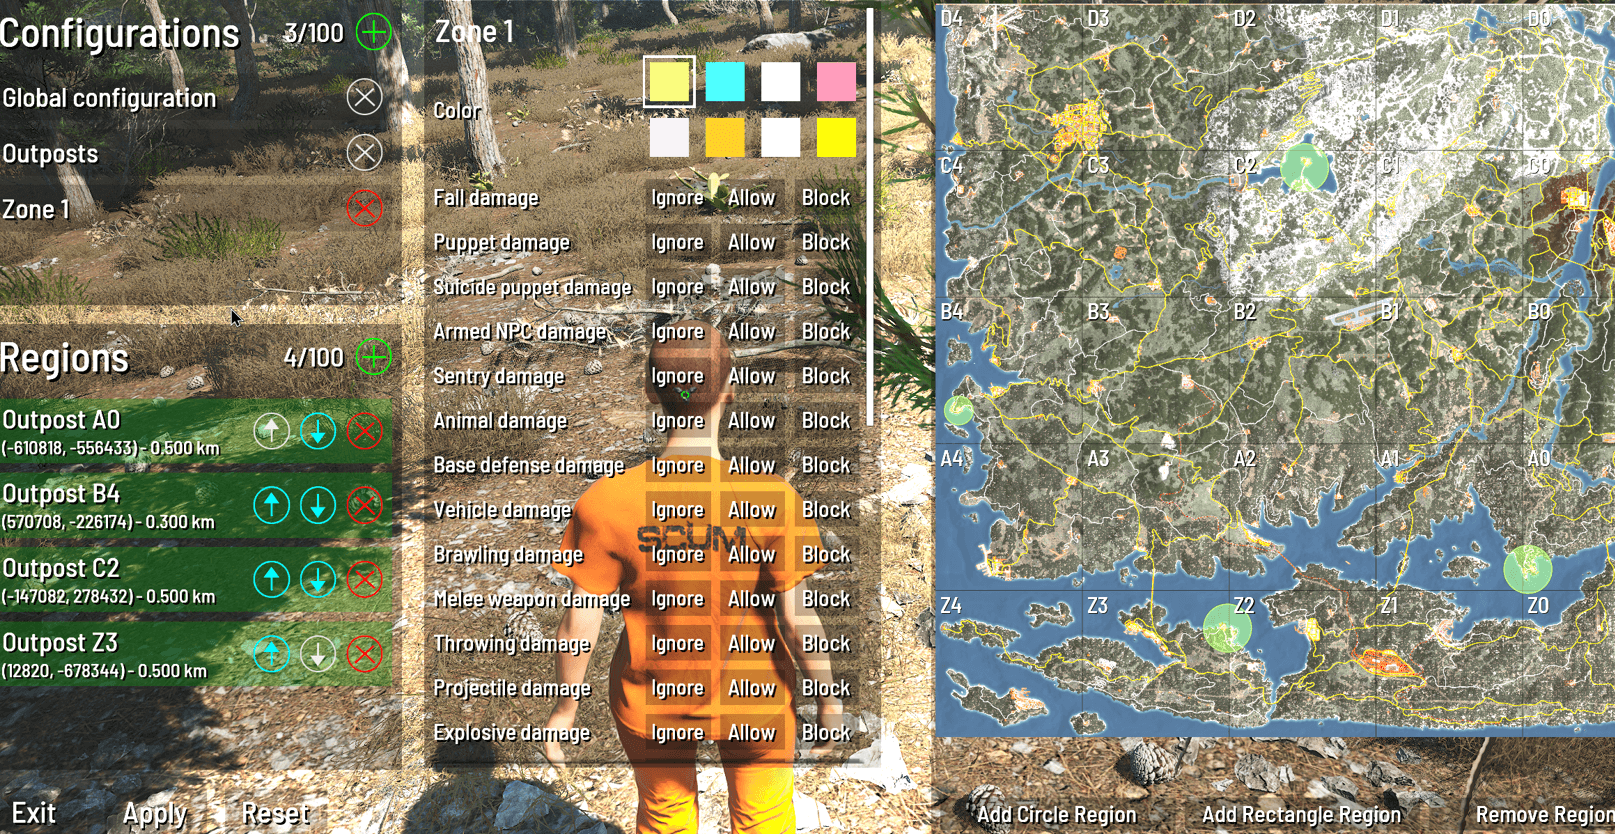
Now, when the designated player joins the server and presses the Escape key, they will see a new Server Settings button, giving them access to the full admin GUI.
Note that server settings will revert to what the configuration on the website is set. However, this is the best way to manage zone configuration as it's not in the config unless you add it manually.
Troubleshooting
#Commands Not Working?: Ensure the Steam ID is correct in theAdminUsers.inifile and that the server was restarted.- "Server Settings" Button Not Appearing?: Double-check that the Steam ID is correct in the
ServerSettingsAdminUsers.inifile (not the other admin file) and that the server was restarted. - Some commands require special developer privileges, which are only obtainable through database modifications using SQL.
Useful Commands for Admins
General Commands
| Command | Description |
|---|---|
| #Announce | Sends the announcement message to all currently connected players. |
| #Location | Displays the player's current location. If player is unspecified, shows your location. |
| #ListAnimals | Displays a list of all spawnable animals. |
| #ListItems | Lists all assets with the specified string. If the string is not specified, lists all items. |
| #ListMutedPlayers | Displays a list of all currently muted players. |
| #ListPlayers | Displays a list of all connected players. |
| #ListSpawnedVehicles | Displays a list of all vehicles on the server and their locations. |
| #ListSquadMembers | Displays the list of all squad members. If 'true', this will copy the result to the clipboard. |
| #ListSquads | Displays a list of all squads on the server. |
| #ListZombies | Displays a list of all spawnable puppets. |
| #VisualizeBulletTrajectories | Enables or disables bullet trajectories visualization. Note: Only displays for the command giver. |
| #visualizeplayeraiming | Enables or disables player aim direction visualization. Note: Only displays for the command giver. |
Player Control Commands
| Command | Description |
|---|---|
| #Ban | Kicks the specified player from the game and prevents them from connecting to this server until unbanned. |
| #Kick | Kicks the specified player from the game. |
| #Mute | Prevents the specified player from sending chat messages to other players. |
| #ResetSquadInfo | Resets squad name and information. |
| #SetFacialHairLength <0-1> | Sets facial hair length to the specified value. |
| #SetFamePoints | Sets fame points of the specified player to the specified value. |
| #SetFamePointsToAll | Sets fame points of all online and offline players to the specified value. |
| #SetFamePointsToAllOnline | Sets fame points of all players currently online to the specified value. |
| #SetGodMode | Enables or disables god mode. To unlock the command, you need to add the suffix "[godmode]" after the Steam ID. |
| #SetHairLength <0-1> | Sets hair length to the specified value. |
| #Teleport | Teleports the specified player to the specified coordinates. If player is unspecified, teleports you. |
| #TeleportTo | Teleports the specified player to another player. If the player to teleport is unspecified, teleports you. |
| #TeleportToMe | Teleports the specified player in front of you. |
| #TeleportToVehicle | Teleports the specified player to the vehicle with the specified ID. If player is unspecified, teleports you. |
| #Unban | Lifts the ban on the specified player, allowing them to connect to the server again. |
| #UnMute | Re-enables chat messaging for the specified player. |
Asset Spawn/Despawn Commands
| Command | Description |
|---|---|
| #DestroyAllVehicles | Destroys all vehicles. If you don’t include "please", it returns: "You have to ask nicely!". |
| #DestroyVehicle | Destroys the vehicle with the specified ID. |
| #SpawnAnimal | Spawns a specified amount of the given animal type. |
| #SpawnItem | Spawns one or more items in front of the invoking player. |
| #SpawnRandomAnimal | Spawns a randomly chosen animal in front of the invoking player. |
| #SpawnRandomZombie | Spawns a randomly chosen puppet (zombie) in front of the invoking player. |
| #SpawnVehicle | Spawns a vehicle in front of the invoking player. |
| #SpawnZombie | Spawns a specified amount of the given zombie type. |
| #spawnitem AmmoCount | Spawns one or more items in front of the invoking player with the specified percentage of ammo loaded into it. |
A full command reference is available in the SCUM developer documentation or community wikis.
Conclusion
You are now officially an admin, armed with the knowledge and the commands to fully control your SCUM server. While the power to spawn any item or teleport across the map is at your fingertips, the true strength of an admin lies in using these tools to foster a fair, engaging, and unique community for your players. Whether you're hosting events, resolving disputes, or just keeping things running smoothly, you have everything you need to succeed. Use your new powers wisely, and build an island that players will want to call home.
If you have any questions or need assistance, feel free to reach out to our customer care agents through our live chat or email at [email protected].