Last Update 2025-04-05 05:37:50
Telnet Commands for your 7 Days to Die Server
You're now in the driver's seat of your 7 Days to Die server, thanks to the telnet console! But to really take control, you need to know how to use the commands. This guide will be your friendly helper, explaining the most useful commands in plain language. We'll show you how to manage your players, change things in your game world, and make your server exactly how you want it.
Before we dive into the commands, make sure you're connected to your 7 Days to Die telnet console! If you need a hand with that, check out this guide. Once you're connected, you'll be ready to follow along as we explore the essential commands.
A Categorized Guide to 7 Days to Die Telnet Commands
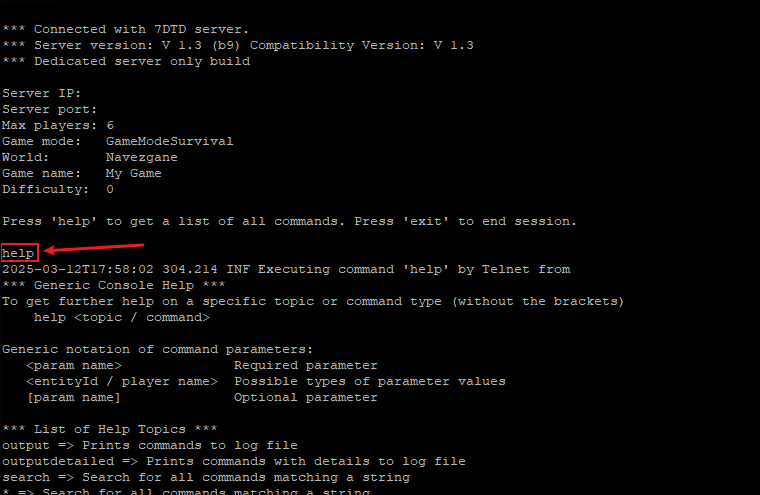
You can also see a basic command list by typing help on the command line once you're connected to Telnet, as shown in this screenshot.

However, for a comprehensive understanding and practical application of these commands, the following categorized list provides in-depth explanations and examples.
1. Player Management:
At the heart of server administration lies player management. These commands allow you to control player access, enforce rules, and maintain a healthy community.
admin: Manage user permission levels, granting or revoking administrative privileges.ban: Manage ban entries, preventing disruptive players from re-entering the server.kick&kickall: Remove players from the server, either individually or en masse, with optional reasons.listplayerids&listplayers: Obtain player information, including IDs and names, essential for targeted commands.teleportplayer: Transport players to specific locations, assisting with gameplay or resolving issues.whitelist: Manage whitelist entries, controlling who can join the server.
2. World Management:
These commands allow you to manipulate the game world, from resetting chunks to exporting prefabs.
agemap: Output debug map for chunk age/protection/save status, providing insights into world stability.chunkcache,chunkobserver, &chunkreset: Manage and reset chunks, crucial for troubleshooting and world maintenance.expiryinfo: Prints location and expiry day/time for the next chunks set to expire, helping to plan for server upkeep.exportcurrentconfigs: Exports the current game config XMLs, allowing for backup and modification.regionreset: Resets chunks within a target region, or for the entire map, useful for large-scale world changes.saveworld: Manually save the world, preventing data loss.smoothworldall: Applies some batched smoothing commands, useful for terrain manipulation.visitmap: Visit a given area of the map. Optionally run the density check on each visited chunk.
3. Entity Control:
These commands focus on manipulating entities, including zombies, animals, and player-owned objects.
ai&aiddebug: Control and debug AI behavior, essential for understanding zombie movement and spawning.kill&killall: Eliminate entities, either individually or in bulk, useful for clearing hordes or troubleshooting.listents: Lists all entities, providing information about their presence and location.loot: Loot commands, allowing you to manipulate loot containers.spawnentity&spawnentityat: Create entities at specific locations, enabling custom encounters.spawnwandering: Spawn wandering entities, adjusting the difficulty and challenge of the game.sleeper: Draw or list sleeper info, for controlling sleeper volumes.
4. Debugging & Performance:
These commands provide tools to diagnose issues, monitor performance, and optimize the server.
debugmenu&debugpanels: Enable debug menus and panels, providing valuable information about the game state.debugshot&debugweather: Capture debug screenshots and dump weather information, aiding in troubleshooting.exception: Throw an exception / log messages, for testing and error reporting.graph: Draws graphs on screen, to monitor performance.listthreads: Lists all threads, crucial for identifying performance bottlenecks.mem&memcl: Monitor memory usage and manage garbage collection.profiler&profiling: Utilize profiling tools to analyze performance and identify areas for improvement.SystemInfo: List SystemInfo, for hardware troubleshooting.
5. Player State:
These commands allow you to directly affect player attributes, such as buffs, experience, and hunger.
buff&buffplayer: Apply buffs to players, granting temporary advantages.debuff&debuffplayer: Remove buffs from players.gamestage: Shows the gamestage of the local player.giveself&giveselfxp: Give items and experience to the local player.givexp: Give XP to a player.resetallstats: Resets all achievement stats.starve&thirsty: Modify player hunger and thirst levels.
6. Game Settings:
These commands allow you to adjust various game settings, from permissions to time.
commandpermission&webpermission: Manage command and web permissions, controlling access to administrative functions.getgamepref&setgamepref: Get and set game preferences, customizing gameplay mechanics.gettime&settime: Get and set the current game time, affecting day/night cycles and events.setgamestat: Sets a game stat.settargetfps: Set the target FPS the game should run at.
7. Visuals & Rendering:
These commands allow you to manipulate the game's visuals and rendering, from camera angles to lighting effects.
camera&fov: Control camera movement and field of view.enablerendering: Disable live map rendering.lights: Light debugging.rendermap: Render the current map to a file.show: Shows custom layers of rendering.trees: Switches trees on/off.
8. Other Commands:
This category encompasses commands that don't fit neatly into the other groups.
give: Give an item to a player.help: Help on console and specific commands.say: Sends a message to all connected clients.teleport: Teleport the local player.weather: Control weather settings.
By understanding these categories and their respective commands, you can effectively manage your 7 Days to Die servers, creating a balanced and engaging experience for all players.
If you encounter any issues or have further questions, feel free to contact our support team for assistance! Happy gaming!